
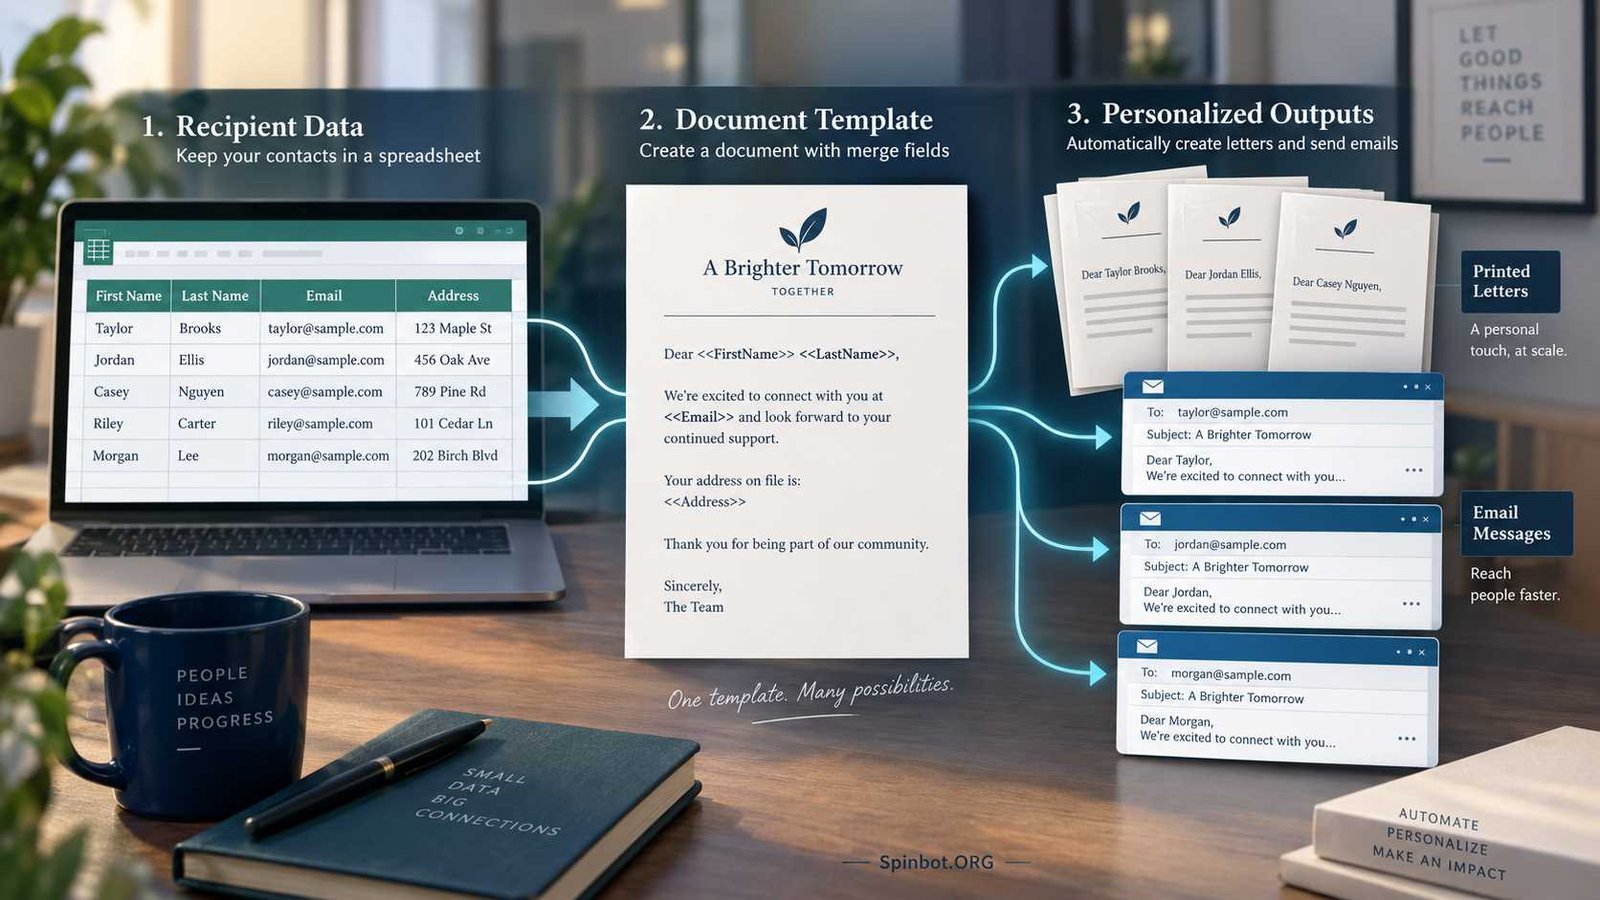
A common setup uses Excel for the recipient list, Word for the document, and Outlook for email delivery. Word does most of the actual merging. Excel mainly stores the data, while Outlook becomes relevant when you want to send the results as individual emails.
That distinction matters because searches such as “how to do a mail merge on Excel” can be misleading. You normally prepare the list in Excel, then complete the mail merge in Word.
What Mail Merge Actually Does
Mail merge combines two things:
- A main document, such as a letter, email, label, or envelope.
- A data source, such as an Excel spreadsheet containing names, email addresses, postal addresses, dates, or other details.
Word connects the two using merge fields. A merge field is simply a placeholder that tells Word which value to pull from your list.
For example, your Word document might contain:
Dear «FirstName»,
Your appointment is scheduled for «EventDate» at «Location».
If your Excel sheet contains 50 people, Word can create 50 personalized versions of that message without you manually changing each name, date, or location. Microsoft describes mail merge as a way to create a batch of personalized documents from one main document and a connected data source.
The same idea works for printed letters, mailing labels, envelopes, certificates, notices, invoices, and personalized email.
Prepare Your Excel File for Mail Merge
The quality of the Excel file determines whether the rest of the process goes smoothly. A messy spreadsheet can cause missing fields, strange dates, lost ZIP-code zeros, or incorrect names.
Imagine you need to send event reminders. Your Excel sheet could look like this:
| FirstName | LastName | EventDate | Location | |
|---|---|---|---|---|
| Sarah | Miller | sarah@example.com | September 18, 2026 | Room A |
| Daniel | Green | daniel@example.com | September 20, 2026 | Room B |
| Aisha | Khan | aisha@example.com | September 21, 2026 | Main Hall |
Each column becomes a possible mail merge field in Word.
Use clear column headings
Give every column a short, clear heading.
Good examples include:
- FirstName
- LastName
- Address
- City
- State
- PostalCode
- EventDate
- AmountDue
If you want to personalize a greeting with only a person’s first name, keep first and last names in separate columns rather than storing the full name in one cell.
Microsoft recommends matching your spreadsheet column names to the fields you want to use in Word. It also recommends completing spreadsheet changes before connecting the workbook to the mail merge document.
Keep one person on each row
Each row should represent one recipient.
Avoid blank rows inside the list. Also avoid placing unrelated notes, totals, headings, or calculations in the same data area.
Mail merge works best when the spreadsheet behaves like a simple database: one row per record and one type of information per column.
Protect ZIP codes and postal codes
One surprisingly common problem appears with codes that begin with zero.
Suppose a postal code is:
00399
Excel may treat that as a number and remove the zeros, leaving:
399
For mail merge, postal codes should normally be formatted as Text so leading zeros are preserved. Microsoft specifically recommends this approach.
The same idea applies to other values that look numeric but are really identifiers, such as membership numbers or employee IDs.
Check dates, percentages, and currency
Formatting deserves attention before you connect Excel to Word.
A date that looks like:
September 18, 2026
in Excel may not always appear exactly that way once merged. Currency and percentage values can also produce unexpected results if their underlying values and formats are not set correctly.
Microsoft recommends formatting these columns appropriately in Excel before using them as a mail merge data source.
If appearance matters, test several records before sending or printing the full batch.
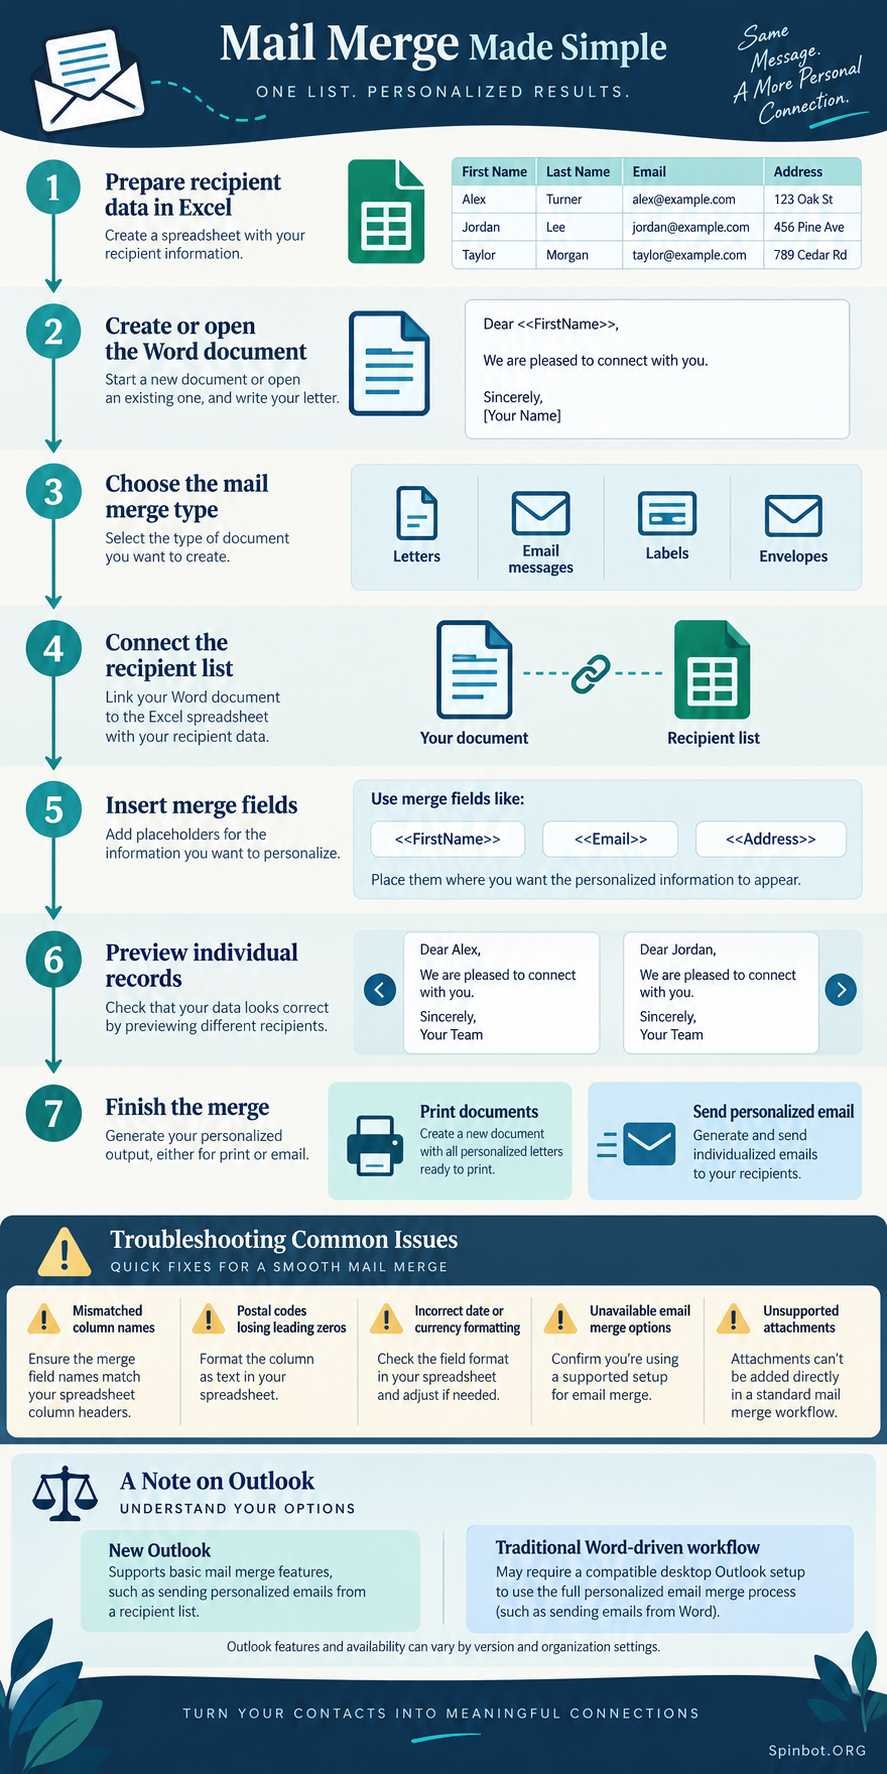
How to Mail Merge Excel to Word
Once your spreadsheet is ready, move to Microsoft Word.
These steps assume you are using a desktop version of Word that supports the traditional Mailings workflow.
1. Open or create your Word document
Open the letter, notice, invitation, or other document you want to personalize.
Then select the Mailings tab.
Choose:
Start Mail Merge
Word lets you select the type of merge you want, such as letters, email messages, envelopes, labels, or a directory.
For a standard printed letter, choose Letters.
2. Connect your Excel file
Go to:
Mailings > Select Recipients > Use an Existing List
Find your Excel workbook and open it.
If Word asks you to select a table or worksheet, choose the sheet containing your recipient list.
Microsoft’s current guidance says that, when using Excel as the source, the data you want to merge should be properly organized and available in the worksheet being used for the merge.
3. Review the recipient list
Before adding fields, open:
Mailings > Edit Recipient List
This gives you a chance to decide who should actually receive the document.
You can exclude specific people, sort records, or filter the list.
For example, suppose your spreadsheet contains customers from several cities, but the letter is only for customers in Boston. Filtering the recipient list is cleaner than creating a second spreadsheet just for that mailing.
4. Insert your merge fields
Place the cursor where personalized information should appear.
Then use:
Mailings > Insert Merge Field
If your Excel columns are FirstName, EventDate, and Location, those field names should appear in Word.
You might create:
Dear «FirstName»,
This is a reminder that your appointment is scheduled for «EventDate» at «Location».
Word will replace those fields with the matching values from each Excel row.
Microsoft confirms that individual merge fields come directly from the column headings in your connected data source.
5. Use Address Block or Greeting Line when useful
For letters, Word also provides built-in options such as:
Address Block
and:
Greeting Line
These can save time when you’re working with standard postal addresses or greetings.
However, individual merge fields often give you more control.
For example, instead of relying on a predefined greeting format, you might simply write:
Dear «FirstName»,
That is easier to understand and easier to troubleshoot.
6. Match fields if Word gets confused
Sometimes Word doesn’t recognize which spreadsheet column corresponds to a standard field.
Perhaps your spreadsheet says:
Surname
while Word expects something closer to:
Last Name
If the Address Block or Greeting Line looks incomplete, use Match Fields to tell Word which column belongs to which field.
This is especially useful when the spreadsheet came from another system and you cannot easily rename its columns.
7. Preview the results
This is the step people are most tempted to skip.
Don’t.
Choose:
Mailings > Preview Results
Word will replace the field names with actual data from your list.
Use the previous and next record controls to inspect several recipients.
You are looking for problems such as:
- blank names
- missing addresses
- strange spacing
- incorrect dates
- lost postal-code zeros
- titles such as Mr. or Ms. appearing where they shouldn’t
- empty fields leaving awkward punctuation behind
Previewing multiple records matters because the first record can look perfect while the tenth exposes a problem.
8. Finish the merge
When everything looks correct, choose:
Finish & Merge
For printed documents, you can select Print Documents or create merged documents that you can review before printing.
Microsoft also allows a saved mail merge document to retain its connection to the data source, which makes the setup reusable for future mailings.
That can be useful for monthly notices or recurring customer letters. Just make sure the connected spreadsheet still contains the right people and current information before reusing it.
How to Mail Merge in Outlook
When people ask how to mail merge in Outlook, they may actually mean one of two different workflows.
The traditional method starts in Word and uses Outlook or another compatible mail program to deliver personalized emails.
New Outlook also has its own basic mail merge feature.
These are not identical.
Send Personalized Email Through Word
If you want every recipient to receive an email containing their own name or other Excel data, the Word-based workflow remains important.
Start in Word and choose:
Mailings > Start Mail Merge > E-mail Messages
Then write your email message in Word.
Next:
- Choose Select Recipients.
- Connect your Excel file.
- Insert fields such as FirstName.
- Choose Preview Results.
- Review multiple records.
- Select Finish & Merge > Send E-mail Messages.
Your Excel file must contain a column with the email address for each intended recipient. Microsoft also says Word’s bulk-email mail merge requires a MAPI-compatible email program, and its Windows instructions note that Outlook should be set correctly when it is used with Word.
When the final dialog appears, choose the Excel column containing the email addresses.
For example:
To: Email
Then enter the subject line and choose the mail format.
Microsoft’s Windows instructions state that Word sends an individual message to each email address rather than placing all recipients together on the To line.
That is one of the main advantages over simply pasting 100 addresses into a normal message.
New Outlook and Classic Outlook Do Not Work the Same Way
This is where many older mail merge tutorials become confusing.
Microsoft’s Outlook feature comparison, last updated April 14, 2026, currently marks mail merge as available in classic Outlook but only partially available in new Outlook.
New Outlook does have a basic mail merge option.
From a new email, Microsoft says you can open the Send menu and choose Start mail merge. Each recipient then receives a separate copy without seeing the other recipients.
However, Microsoft currently describes advanced mail merge with variable fields as still coming to new Outlook. In other words, the basic new Outlook feature is useful when everyone should receive a private copy of essentially the same message, but it does not yet replace every traditional personalized Word mail merge workflow.
If you need fields such as:
Dear «FirstName»
or different dates, account numbers, locations, or other values for each recipient, the established Word-driven workflow is the safer option when your desktop setup supports it.
A Practical Mail Merge Example
Suppose a training company needs to email 50 attendees.
Its Excel sheet contains:
- FirstName
- CourseName
- EventDate
- Location
The Word email reads:
Dear «FirstName»,
Your «CourseName» session is scheduled for «EventDate» at «Location».
Please arrive 15 minutes early.
One template can now become 50 individually addressed messages.
But suppose the spreadsheet designer named the first column:
Customer
instead of:
FirstName
The message may still work if you insert the Customer field directly. Trouble appears when you expect Word’s predefined Greeting Line to automatically understand that Customer means first name.
That is where Match Fields becomes useful.
Another failure might be hiding in the location data. One recipient could have an empty Location cell. Preview Results would reveal:
Your First Aid session is scheduled for September 18 at .
The software has technically performed the merge correctly. The data is the problem.
That is why a good mail merge workflow has two checks: verify the spreadsheet first, then preview the merged output.
Common Mail Merge Problems and Fixes
ZIP codes lose their leading zeros
If 00399 becomes 399, format the entire ZIP or postal-code column as Text in Excel before merging. Microsoft specifically recommends text formatting for these codes.
Word cannot find your fields
Check the first row of the spreadsheet.
Every data column needs a clear heading. Then confirm that Word is connected to the correct workbook and worksheet.
If built-in fields such as Address Block are not mapping correctly, use Match Fields.
Merge fields are greyed out
Word generally needs a recipient list connected before many merge-field options become available.
Microsoft notes that if merge-field commands are dimmed, you should first use Select Recipients and choose or create a mailing list.
Merge to E-Mail is missing
Your email setup may be the issue rather than the Word document.
Microsoft’s mail merge instructions say the Merge to E-Mail option can be unavailable when a default email program has not been selected.
The exact behavior can also differ between Windows, macOS, classic Outlook, and new Outlook, so do not assume instructions written for one setup will match another.
Dates or currency appear incorrectly
Fix the formatting in the Excel source first when possible.
For values such as currency, percentages, postal codes, and other numbers, Microsoft recommends preparing the formatting carefully before using the spreadsheet for mail merge.
If the output still looks wrong, test a small group before completing the entire merge.
You need attachments with every personalized email
Be careful here because Microsoft’s instructions differ by platform and mail-merge method.
Its Windows Word guidance says the standard individual mail merge does not support adding normal attachments in the usual way, although links can be included. The same Microsoft support page includes different options for some Mac workflows.
If sending a different PDF, invoice, or file to every recipient is essential, standard Word mail merge may not be the right tool. A dedicated email platform, automation system, or specialized mail merge solution may handle that job more cleanly.
When Word Mail Merge Is Not the Best Choice
Mail merge is excellent when the task is simple and controlled.
It makes sense for:
- personalized customer letters
- event notices
- certificates
- address labels
- membership reminders
- small internal email batches
- invitations
- routine business correspondence
It becomes less attractive when you need a full email-marketing system.
For example, Word and Outlook mail merge is not designed to replace tools built around campaign analytics, unsubscribe management, complex segmentation, automated follow-up sequences, reusable marketing journeys, or detailed delivery reporting.
There is also a practical scale issue. A 30-person event reminder is very different from a promotional campaign sent to tens of thousands of people.
For routine office communication, keeping the workflow inside Excel, Word, and Outlook is often simpler. For serious marketing automation, forcing Word to behave like an email marketing platform usually creates more problems than it solves.
Run a Safe Test Before Sending the Full Merge
The most valuable mail merge habit takes only a few minutes: test before you send everything.
Preview at least several records, including people with unusual names, long addresses, blank optional fields, leading-zero postal codes, and different date or number values.
For email, an even safer approach is to create a tiny test spreadsheet containing your own addresses or approved internal test accounts. Run the entire process against that list first.
Check:
- whether personalization appears in the right places
- whether the subject line is correct
- whether dates and amounts are readable
- whether links work
- whether empty fields create strange sentences
- whether the correct email account is sending the messages
- whether each recipient receives an individual message
Only then connect or select the full list.
Once you understand the division of work, mail merge becomes much easier: Excel stores the recipient information, Word combines it with your template, and Outlook can handle delivery when email is involved. Prepare the spreadsheet carefully, preview real records instead of trusting the template, and pay attention to whether you are using classic Outlook or new Outlook. Those three habits prevent most mail merge mistakes before they reach your recipients.

Covers AI writing tools, large language models, prompt engineering, AI detection, and practical AI writing workflows for Spinbot.ORG.